
Roshada Afzal
In today's fast-paced development environment, deploying applications efficiently and cost-effectively is crucial. Azure Function Apps offer a serverless solution that reduces the need for extensive infrastructure and allows you to focus on writing code. By using Terraform to provision your Function Apps, you can automate and standardize your deployments, ensuring consistency across environments. In this guide, we'll walk you through the process of provisioning a Python Function App using Terraform, highlighting common mistakes and how to avoid them.
Why Use Terraform for Azure Function Apps?
Before diving into the steps, it's important to understand why Terraform is a valuable tool for this process. Terraform allows for Infrastructure as Code (IaC), enabling you to define your cloud resources in a declarative configuration file. This approach not only ensures that your deployments are repeatable and consistent, but it also allows for version control, collaboration, and easier scaling.
Getting Started: Prerequisites
To follow along with this guide, you'll need:
- An Azure subscription
- Terraform installed on your local machine
There are no other prerequisites, making this guide accessible even if you're new to Terraform or Azure.
Step 1: Setting Up the Terraform Provider
The first step is to create a <code>main.tf</code> file and define the Azure provider. This establishes the connection between Terraform and your Azure account.

Here, the <code>provider "azurerm"</code> block specifies that we're working with Azure resources. The <code>features {}</code> block is required to enable the provider even though it’s empty.
Step 2: Creating a Resource Group
Azure organizes resources into logical groups called Resource Groups. It's best practice to provision all resources within the same region to minimize latency and maintain consistency. Below is the configuration to create a Resource Group:
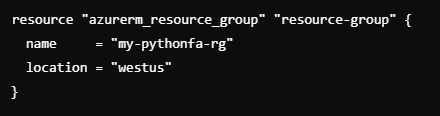
This step ensures that all subsequent resources are contained within this group, simplifying management and reducing redundancy.
Step 3: Provisioning a Storage Account
Next, we need to create a Storage Account, which will handle triggers and store function execution logs.
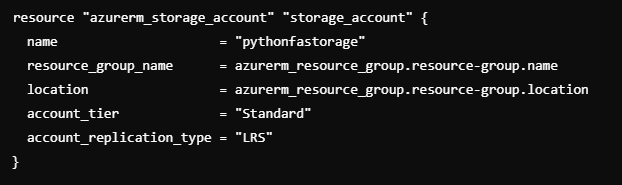
Notice how the <code>resource_group_name</code> and <code>location</code> are derived from the Resource Group we created earlier. This establishes a dependency, ensuring that the Storage Account is only created after the Resource Group.
Step 4: Setting Up Application Insights
Application Insights provides monitoring and diagnostics for your Function App. It’s crucial for gaining insights into the performance and health of your application.
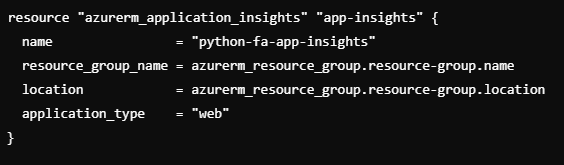
By integrating Application Insights, you'll have access to valuable telemetry data, helping you troubleshoot and optimize your Function App.
Step 5: Creating an App Service Plan
An App Service Plan is required to host your Function App. Here, we’ll create a plan optimized for a Linux environment, as Python Function Apps are not supported on Windows.
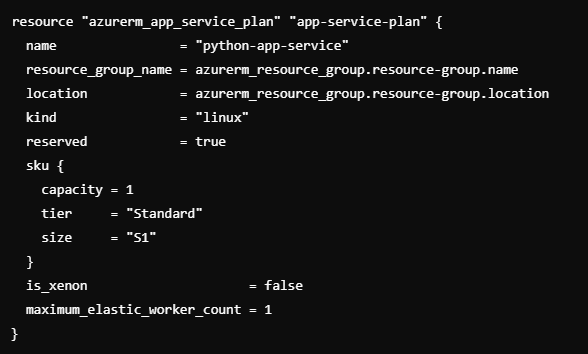
Important Note: Ensure that the <code>kind</code> is set to <code>linux</code>, as Python Function Apps are not compatible with Windows App Service Plans. Additionally, remember that Windows and Linux App Service Plans cannot coexist in the same region under the same Resource Group.
Step 6: Creating the Function App
Finally, it's time to create the Function App itself. This is where all the pieces come together.
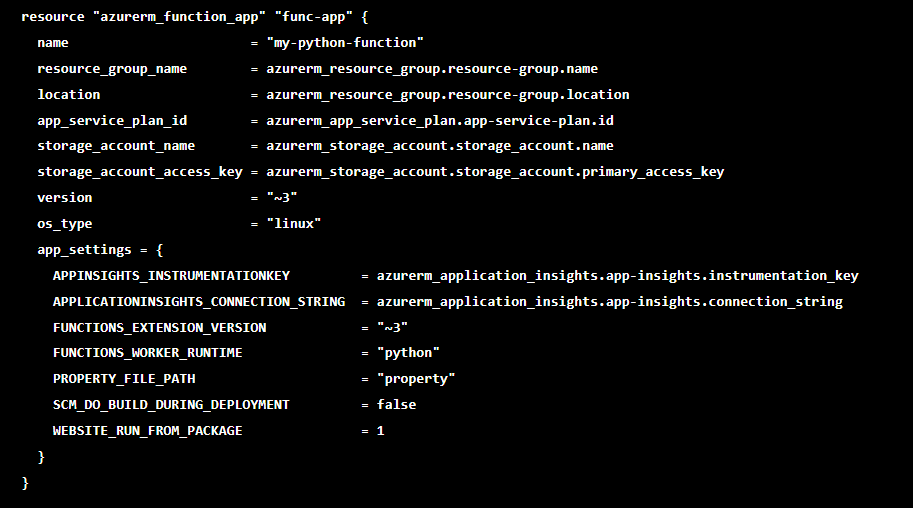
In this step, we define the dependencies and configurations necessary for the Function App. Notice the <code>app_settings</code> block, where you can also add custom settings as needed.
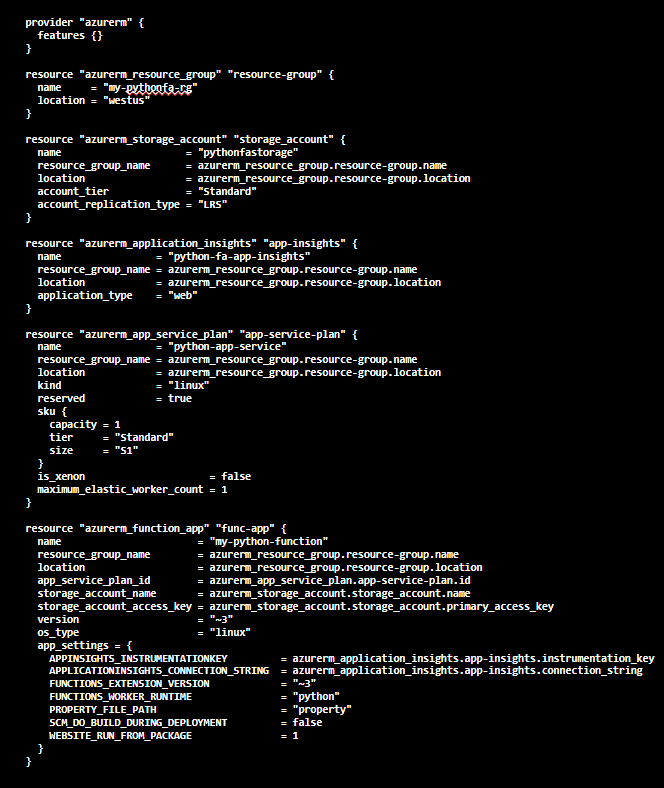
Final File Overview
Your complete <code>main.tf</code> file should resemble the following structure:
Deploying Your Infrastructure
To deploy your infrastructure, follow these commands:
Initialize Terraform

This command initializes the working directory containing Terraform configuration files. It downloads necessary plugins and prepares the environment.
Create an Execution Plan

This command generates an execution plan, previewing the changes Terraform will make to your infrastructure.
Validate the Configuration

This ensures that the configuration is syntactically correct and ready for deployment.
Apply the Plan

This command applies the changes specified in the execution plan, provisioning the infrastructure on Azure.
Conclusion
Provisioning a Python Function App with Terraform can greatly simplify your deployment process, ensuring consistency and reducing manual errors. By following the steps outlined in this guide, you can set up your Function App efficiently while avoiding common pitfalls. Remember, the key to successful Terraform deployments lies in understanding the dependencies and maintaining a clear, organized configuration.