
Ravindra Singh
“Security in Kubernetes isn’t just about building walls, it’s about setting guardrails so teams can move fast.” — Liz Rice
Kubernetes has become the backbone of modern infrastructure. It gives teams the speed to ship features quickly, but that speed often comes at a cost. A single misconfigured pod can open security gaps. A missing label can break monitoring or cost tracking. A mistyped command in production can disrupt critical services in seconds.
Logs may eventually reveal what went wrong, but only after the impact has been felt. What’s missing is proactive governance and rules that prevent risky workloads from reaching production without slowing developers down.
This is where Kyverno plays a critical role. As a Kubernetes-native policy engine, it introduces guardrails that block unsafe workloads, correct misconfigurations, and maintain consistency while keeping development velocity intact.
As Kelsey Hightower puts it, Kubernetes is “a platform for building platforms… not the endgame.” Kubernetes provides the foundation, but it is governance tools like Kyverno that make that foundation reliable and production-ready at scale.
So how does it actually fit into the cluster? Let’s take a closer look.
How Kyverno Fits Inside Your Cluster
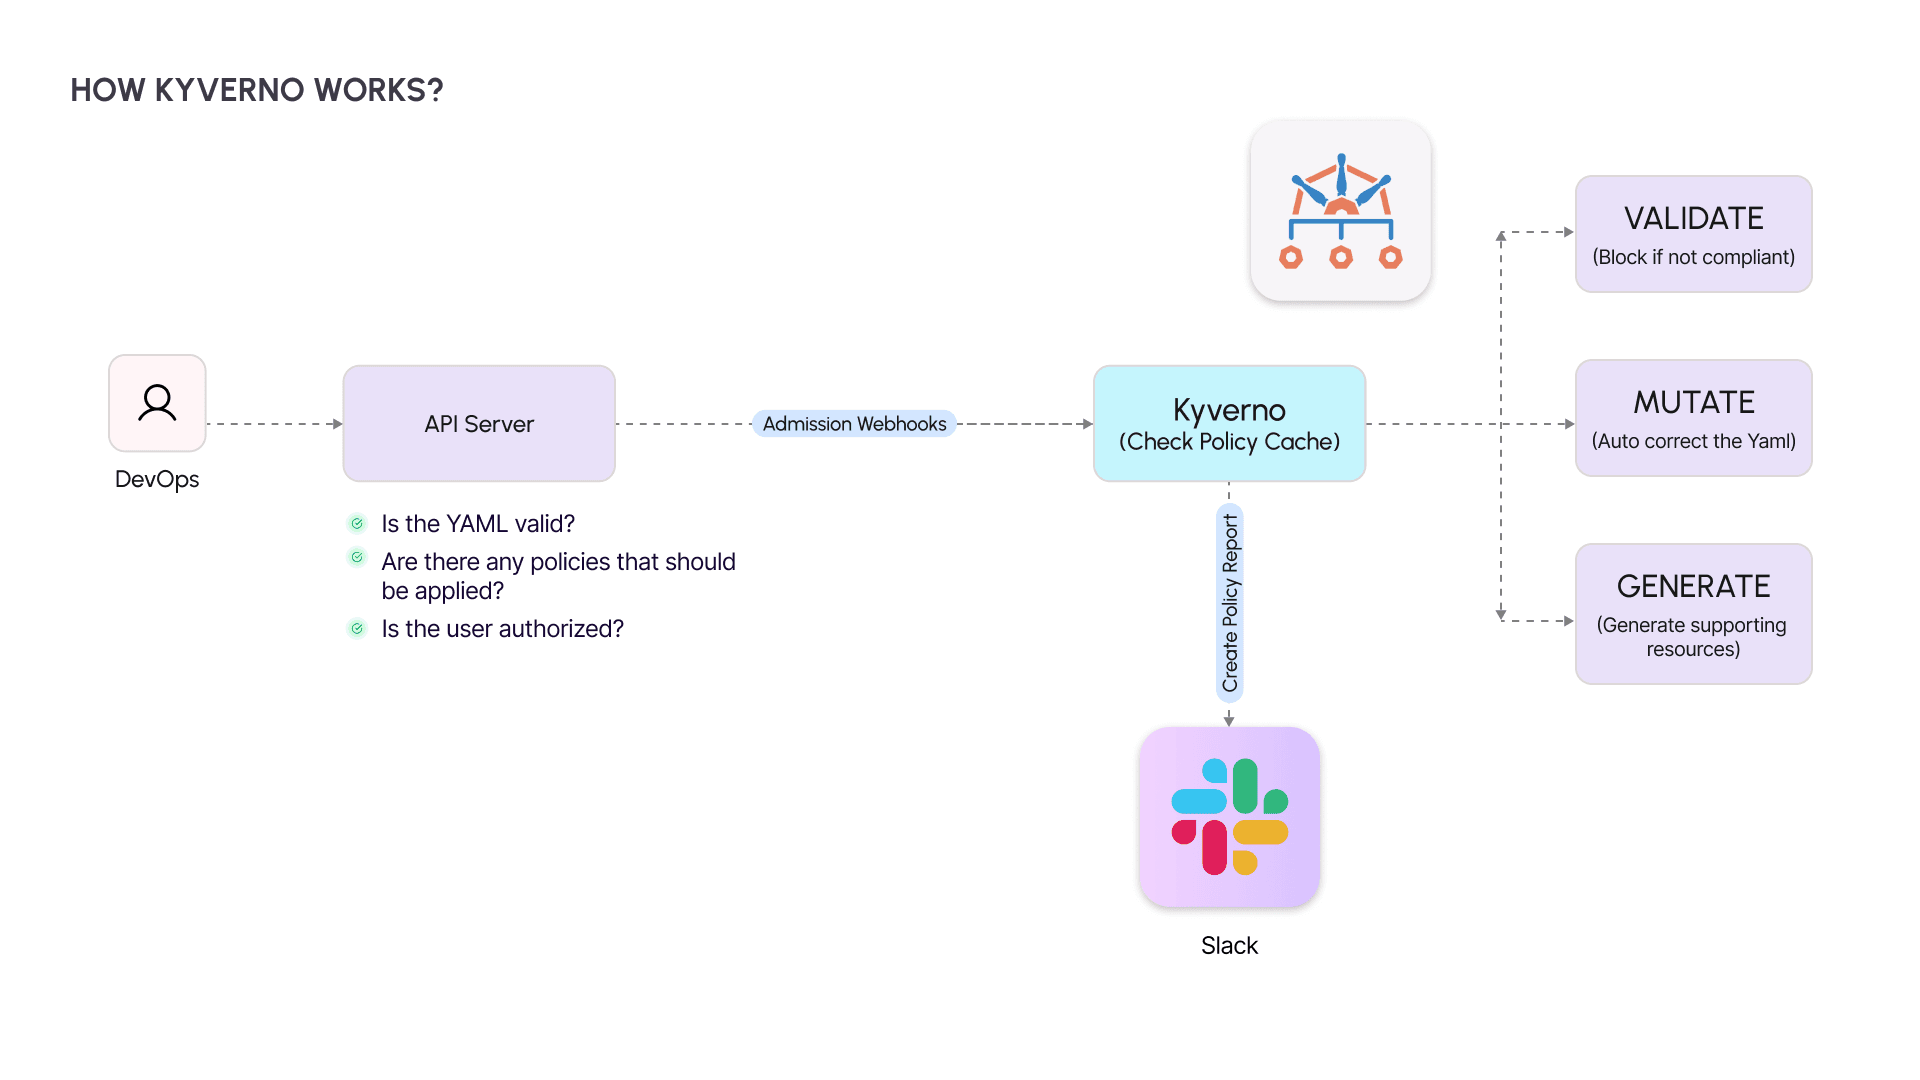
You push a change. Kubernetes does not accept it blindly. Before anything touches the cluster, the API server checks the basics: Is the YAML valid? Is the caller authorized? Do any policies apply?
This is where Kyverno sits on the admission path. Acting as a checkpoint, it evaluates each incoming object against its policy cache and decides whether to:
- Validate → Block unsafe or non-compliant resources.
- Mutate → Fix small mistakes automatically, like adding missing labels.
- Generate → Create supporting resources on the fly, such as a default NetworkPolicy.
Kyverno then returns an allow or deny decision to the API server and writes the outcome into a Policy Report. If Policy Reporter is connected to Slack, those results don’t stay buried in logs - they surface instantly where your team can act.
From here, we can trace a single request end-to-end to see how the process works step by step.
How It Works: Step by Step
When you apply a resource in Kubernetes, it doesn’t go straight into the cluster. Each request follows a series of checkpoints designed to validate and secure it. Let’s walk through that path.
1. API Server Receives the Request
You run:
kubectl apply -f deployment.yaml
The API server parses the YAML, checks if the schema is valid, and confirms whether the user has the necessary permissions.
2. Admission Webhook Sends It to Kyverno
Before the resource can be created, the API server forwards it to Kyverno through an admission webhook. This is where governance enters the workflow.
3. Policy Matching Against the Cache
Kyverno reviews its policy cache to identify any rules that apply to the resource. These can range from security requirements to operational standards.
4. Evaluation and Action
Depending on the matched rules, Kyverno decides how to handle the resource:
- Validate: If the resource fails a validation policy (e.g., a pod running as root), the request is denied.
- Mutate: If small corrections are needed (e.g., a missing label), Kyverno automatically patches the resource.
- Generate: If additional resources are required (e.g., a default NetworkPolicy), Kyverno creates them automatically.
5. Response Back to the API Server
Kyverno sends the result, allowing, denying, or patching back to the API server. The resource is either created, modified, or blocked before it reaches the cluster.
6. Reporting and Visibility
Each decision is logged in a Policy Report. If Policy Reporter and Slack are configured, the violation or correction is immediately pushed to the team’s communication channels.
This flow ensures policies are enforced right at the entry point, before anything risky can slip into production.
But that raises an important question: why Kyverno? What makes it different from other policy engines you could plug into Kubernetes?
Why Kyverno?
At this point, the mechanics are clear. But why choose Kyverno over other options for Kubernetes governance? The answer lies in how naturally it fits into the Kubernetes ecosystem.
Kubernetes-native
Policies are defined in YAML, the same format already used for deployments and configurations. There’s no new domain-specific language to learn, making adoption straightforward for teams already familiar with Kubernetes manifests.
Accessible to engineers, not just security specialists
Kyverno is designed for DevOps and platform teams as much as for security teams. Anyone who works with Kubernetes resources can define, apply, and test policies without needing advanced security expertise.
Multi-purpose guardrails
Beyond validation, Kyverno can also mutate resources to correct issues automatically, generate new resources to enforce standards, and even clean up resources when needed. This covers the full lifecycle of governance.
Scales with organizations
As Kubernetes use grows across teams and environments, the challenge shifts from simply writing policies to consistently applying them. Kyverno makes that consistency possible.
With the “why” answered, the next step is practical: how do you set it up in your own cluster?
Setting Up Kyverno and Policy Reporter
Getting Kyverno up and running is straightforward. You’ll install Kyverno itself, add Policy Reporter for visibility, and then load a set of predefined policies as your baseline guardrails.
Step 1: Install Kyverno
Kyverno runs as an admission controller within your cluster. Add the Helm repository, update it, and install:
helm repo add kyverno https://kyverno.github.io/kyverno/ helm repo update helm install kyverno kyverno/kyverno --create-namespace -n kyverno -f kyverno-values.yaml
Step 2: Add Policy Reporter with Slack integration
Policy Reporter provides a dashboard and can forward alerts directly to Slack. Install it with Helm:
helm repo add policy-reporter https://kyverno.github.io/policy-reporter helm repo update helm install policy-reporter policy-reporter/policy-reporter --create-namespace -n policy-reporter -f kyverno-ui.yaml
Step 3: Install predefined Kyverno policies
Kyverno ships with policy bundles that cover common scenarios such as blocking privileged containers and enforcing best practices. Install them using:
helm repo add kyverno https://kyverno.github.io/kyverno/ helm repo update helm install kyverno-policies --create-namespace -n kyverno kyverno/kyverno-policies
For more examples and sample configurations, check out the Kyverno lesson in this GitHub repository.
With the setup done, let’s see Kyverno in action through real policy examples.
Kyverno in Action: Real Policy Examples
With Kyverno installed, the next step is to see how policies work in practice. The following examples illustrate how it enforces security, consistency, and operational discipline within a Kubernetes environment.
1. Validate Policy — Block Containers Running as Root
Running pods as root introduces unnecessary risk. This policy enforces the requirement to run as non-root:
apiVersion: kyverno.io/v1 kind: ClusterPolicy metadata: name: validate-run-as-non-root spec: validationFailureAction: Enforce rules: - name: block-root-containers match: resources: kinds: - Pod validate: message: "Running as root is not allowed." pattern: spec: containers: - securityContext: runAsNonRoot: true
Value: Prevents insecure workloads from being scheduled in the cluster.
2. Mutate Policy — Add Default Labels to Pods
Operational visibility often depends on consistent labeling. This policy automatically injects a default label:
apiVersion: kyverno.io/v1 kind: ClusterPolicy metadata: name: add-default-label spec: rules: - name: inject-env-label match: resources: kinds: - Pod mutate: patchStrategicMerge: metadata: labels: env: default
Value: Ensures every pod carries a baseline label, simplifying monitoring and cost attribution.
3. Generate Policy — Create a Default NetworkPolicy in New Namespaces
To prevent open namespaces, Kyverno can generate a restrictive NetworkPolicy whenever a new namespace is created:
apiVersion: kyverno.io/v1 kind: ClusterPolicy metadata: name: generate-default-network-policy spec: rules: - name: auto-create-network-policy match: resources: kinds: - Namespace generate: kind: NetworkPolicy apiVersion: networking.k8s.io/v1 name: default-deny namespace: "{{request.object.metadata.name}}" data: spec: podSelector: {} policyTypes: - Ingress - Egress
Value: Establishes a security baseline by denying all traffic unless explicitly permitted.
4. Validate Policy — Prevent Deletion of Critical Resources
Production workloads are vulnerable to human error. This policy protects critical resources from accidental deletion:
apiVersion: kyverno.io/v1 kind: ClusterPolicy metadata: name: prevent-critical-resource-deletion spec: validationFailureAction: Enforce rules: - name: block-delete-critical-resources match: resources: kinds: - ConfigMap - Secret - Deployment - Service - Ingress - PersistentVolumeClaim namespaces: - production preconditions: all: - key: "{{request.operation}}" operator: Equals value: DELETE validate: message: "⛔️ Deletion of critical resources is not allowed in production namespace." deny: {}
Value: Safeguards key production assets by blocking unauthorized or accidental deletions.
These examples demonstrate Kyverno’s ability to enforce security policies, improve consistency, and automate governance across Kubernetes clusters.
The next step is to validate these policies against real workloads and observe their behavior in action.
Testing the Policies
Writing policies is important, but their true value comes from testing how they behave under practical scenarios. The following examples demonstrate how Kyverno enforces rules and how violations surface when combined with Policy Reporter and Slack.
1. Testing the Run as Non-Root Policy
Create a pod without a securityContext to simulate a container that runs as root:
apiVersion: v1 kind: Pod metadata: name: root-pod spec: containers: - name: nginx image: nginx
Expected Outcome: Kyverno blocks the pod because it violates the policy requiring runAsNonRoot: true.
2. Testing the Default Label Injection Policy
Deploy a pod manifest without labels:
apiVersion: v1 kind: Pod metadata: name: test-pod-no-label spec: containers: - name: nginx image: nginx:latest securityContext: runAsNonRoot: true
Expected Outcome: Kyverno mutates the resource, automatically injecting the env: default label.
3. Testing the Default NetworkPolicy Generation
Create a new namespace:
kubectl create namespace test-np
Expected Outcome: Kyverno generates a default-deny NetworkPolicy for the new namespace, ensuring a secure baseline.
4. Testing the Critical Resource Deletion Prevention Policy
Attempt to delete a production Deployment or Service:
kubectl delete deployment my-app -n production
Expected Outcome: Kyverno denies the operation and logs the violation, protecting critical resources from accidental removal.
These tests confirm that Kyverno’s policies actively shape workload behavior, not just exist on paper. And when paired with Policy Reporter and Slack, each violation is surfaced in real time, giving teams immediate visibility into risks.
The next step is to see how monitoring and alerting provide the other half of the picture: visibility at scale.
Monitoring and Slack Alerts
Policy enforcement is only effective if teams can see what is happening across their clusters. This is where Policy Reporter and Slack integration complement Kyverno by adding visibility and real-time feedback.
1. Accessing the Policy Reporter Dashboard
Policy Reporter provides a web-based interface to review Kyverno’s policy decisions. It aggregates policy results across namespaces and displays compliance status for each workload.
Access the dashboard with port-forwarding:
kubectl port-forward service/policy-reporter-ui 8080:8080 -n policy-reporter
From here, teams can drill down to see which policies were enforced, which workloads failed validation, and which resources were automatically mutated or generated.
2. Investigating Non-Compliant Workloads
Consider a policy that requires every pod to include an app label. If a pod is created without this label, Kyverno records the violation. Policy Reporter highlights the issue in its dashboard, making it easy to track patterns of non-compliance across namespaces.
apiVersion: kyverno.io/v1 kind: ClusterPolicy metadata: name: require-label spec: validationFailureAction: Audit rules: - name: check-label match: resources: kinds: - Pod validate: message: "Label 'app' is required on every Pod." pattern: metadata: labels: app: "?*"
3. Real-Time Slack Notifications
For many teams, dashboards are useful but not enough. Slack integration ensures that violations are pushed directly to team channels. When a pod without the app label is created, the following sequence occurs:
- Kyverno flags the violation.
- A Policy Report entry is created.
- Policy Reporter sends a Slack alert containing the policy name, namespace, and the affected resource.
To reduce noise, you can configure which policies trigger alerts by editing your Slack filter in values.yaml:
policies: include: ["prevent-critical-resource-deletion", "require-label"]
This real-time loop keeps violations visible without overwhelming teams. With enforcement and visibility working hand in hand, the final step is to reflect on what this means for Kubernetes at scale.
Conclusion & Key Takeaways
Kubernetes has become the foundation for modern infrastructure, but speed without governance is fragile. What makes it dependable at scale is a system of guardrails that prevent issues before they reach production and make risks visible the moment they occur.
Kyverno, with its ability to enforce policies at admission and surface results through Policy Reporter and Slack, shows how governance can move from reactive firefighting to proactive control. The result is a platform that supports both velocity and reliability.
For organizations running workloads on Amazon EKS, these practices are even more critical as clusters span teams and environments. Coditas brings AWS-certified expertise to embed security, compliance, and governance into EKS without slowing down delivery. If improving Kubernetes governance on EKS is on your roadmap, connect with us to explore how we can help.
Key takeaways
- Governance is strongest when it prevents issues at admission, not after deployment.
- Real-time visibility turns policy enforcement into actionable intelligence.
- Guardrails enable teams to move quickly while staying compliant.
- Kubernetes provides the foundation, but governance makes it production-ready.